


When you’re starting in DIY, it can feel like there’s an overwhelming number of power tools to choose from.
Sanding, in particular, is one of those jobs that can quickly turn into a nightmare without the right tool in your hands. It took me a whopping 250 hours to restore the staircase in our last house, and I’m convinced that I could have saved at least ⅓ of the time if I’d used the right sander. If only I knew then what I’m sharing now!
That’s where finding the best sander is so important. It’s the difference between a project that looks “DIY” and one that looks like it came straight out of a showroom.
We’re sharing the sanders we’ve tested, which sander we love most (it’s a game-changer), which is a must-have for sanding furniture and which sanders you probably shouldn’t waste your hard-earned money on.
Table of Contents
Types of Sanders
This post contains affiliate links. We only recommend products we love and think that you will, too! Read our full disclaimer here.
Belt Sander
A belt sander is ideal for bigger projects like sanding large, flat surfaces. It’s built for power and uses a continuous sandpaper loop (the “belt”) to remove material and smooth out uneven surfaces quickly.

While it’s great for heavy-duty tasks, it’s not ideal for fine sanding. It can leave scratches and swirl marks, and controlling it, especially around edges or corners, can be tricky.
Orbital Sander
Orbital sanders are a great choice for lighter sanding tasks and curved surfaces. This tool uses a circular sandpaper pad that moves in tiny orbits, making it ideal for fine sanding and leaving a smooth, even finish.

However, it’s not the best for heavy-duty jobs, as removing material or smoothing rough surfaces can take a while. And if you’re not careful, you might end up with unwanted circular marks on the wood.
That’s why we recommend choosing a random orbit sander instead.
Random Orbital Sander
A random orbital sander is our go-to for achieving a flawless finish on larger surfaces without annoying swirl marks. Thanks to its dual motion—it moves both orbital and random—this sander is perfect for smoothing everything from wood to plaster and sanding paint or varnish between coats.

With sanding discs that orbit and rotate simultaneously, it leaves the surface virtually scratch-free. When you combine it with a flexible backing, it’s also great for working on curved surfaces.
If you’re only investing in one sander, a random orbital sander is the one to get! It’s great for most DIY and home improvement projects, as well as building or refreshing furniture.
Detail Sander / Mouse Sander
A detail sander is your best bet when you need to get into tight spots. It has a small vibrating head with a triangular sandpaper attachment, making it easy to reach hard-to-reach corners that larger orbital or belt sanders can’t. It’s also known as a ‘corner,’ ‘delta,’ or ‘mouse’ sander (although there are slight variations from tool to tool).

What to Consider When Buying a Sander
We’ve tested sanders from many brands, including Bosch, Ryobi, and Festool. And while price is always something to consider, what matters is finding the right sander for the projects you’re tackling. A great sander can save you hours of work and help you achieve a smooth finish with minimal effort.

I shared the most common types of sanders above, but you definitely don’t need to invest in them all! I’ve seen so many people recommend having multiple sanders, but as a DIYer, I honestly think it’s overkill.
Invest in just ONE good sander, and you’ll be good to go!
There’s no getting around the fact that the sanders I’m recommending are expensive. Out of all the power tools we own, our sander is by far the most expensive—but it’s worth every penny.
No matter what sander you opt for, here are a few things to consider.
Corded vs. Cordless
A corded sander gives you consistent power, but some models allow you to switch between corded and battery operation. We personally prefer the corded version, as there’s nothing I hate more than running out of battery in the middle of a project.
High-end sanders also have rubber cables that don’t get tangled (at least not as much as normal cables), and you can easily replace it yourself if it’s ever damaged.

Changeable Pads
Opt for a sander that lets you easily switch out sanding pads.
This is crucial when moving between coarse and fine grits, saving you time and making the job more efficient. The gripper pads on sanders tend to wear out over time, so try to find a sande where the whole pad can be replaced when needed.

We had this issue on our cheap Bosch mouse sander, and the sandpaper kept falling off the Velco mounting pad, making it impossible to use anymore (even though the actual sander still worked fine).
The Rotex sander we love even allows you to change the whole sanding head, and you can switch it from round to triangular, turning it into a delta sander, making it perfect for sanding hard-to-reach areas.
Adjustable Speed
Having variable speed settings gives you much more flexibility. Start slow for delicate areas or anything veneered, then speed things up when covering larger surfaces.

Dust Control & Collection
Being able to attach your vacuum to the sander is a must.
Obviously, you don’t want to be breathing in any sawdust (you should still wear a mask when sanding) or risk slipping on sawdust that’s all over the floor, but there are other reasons for removing any sawdust as quickly as possible.

Without a vacuum, the sawdust can collect between the sandpaper and the workpiece, thus making it harder to sand the wood. Removing the sawdust increases the sanding efficiency and effectiveness and can even extend the life of your tool.
Best Sander Brands for DIYers
Ryobi
Known for affordability, Ryobi sanders are a great entry point for beginners who still want quality results. Our Ryobi nailer is still one of our most-used favourite tools.

Bosch
Bosch sanders are known for balancing ease of use with solid performance. This extremely popular brand offers very well-built tools that never disappoint in their power and performance.
They’re a great mid-range choice and were our go-to when we first started DIYing. To this day, we still buy Bosch tools and have always been happy with them.

Makita
Makita offers reliable performance and is particularly good for projects requiring both heavy-duty and fine sanding. Their tools are robust and designed for long-term use. Makita is one of my favourite power tool brands and, in most cases, is now our go-to for power tools.
Festool
A premium brand with a price tag to match, Festool sanders are built for durability. While pricey, they’re worth it if you want professional results. They come with a 3-year warranty and are by far the best sanders we’ve ever used.

One of them stopped working (we still have no idea why), so we sent it to be repaired, and it came back a couple of days later as good as new. The process was so easy and straightforward – exactly what you need when you’re in the middle of a sanding project.
Obviously, there are endless other brands, but these are the ones we use and have tried and tested over the last 12 years of renovating our homes and tackling hundreds of projects.
What is the Best Sander for Refinishing Furniture?
Refinishing furniture can bring new life to old pieces, and having the right sander is key to a beautiful, smooth finish.
We recommend using a random orbital sander for most furniture refinishing projects like our recent wardrobe makeover. It’s the perfect tool for sanding off old finishes without damaging the wood underneath.

Start with a coarser grit to remove the bulk of the finish, then gradually work your way to a fine grit to smooth out the surface. If you’re unsure what type of grit to use for your project, we’ve shared a full guide on how to sand wood, including a helpful guide on which grit to use for your project.
For intricate or detailed areas, switch to a detail sander. It’ll help you get into tight corners and along curved edges where larger sanders just can’t reach. You can also try hand-sanding these areas if necessary.

Choosing the right sandpaper grit is as important (if not more so) as choosing the sander. We created a sandpaper grit cheat sheet to make choosing the right grit for your project easy.
What is the best sander for removing paint from wood?
The best sander and sandpaper grit for removing paint from wood and wooden furniture will depend on what kind of paint you’re trying to remove, what condition it’s in and how thick the paint is.

If you have a lot of coarse sanding to do, we recommend using this sander. It has a setting that allows you to quickly sand and remove a lot of the paint layer. It also has an interchangeable top in a triangle shape that allows you to reach all corners.

The drawback, besides being expensive, is that the sander head is fairly small. You can buy sanders with larger heads, but we prefer this size as it makes it easier to sand smaller pieces.
Hate sanding? Don’t miss these tips on how to sand wood and save time & get amazing results!
What is the Best Sander for Stairs?
If you’ve ever attempted to sand your staircase, you’ll know that it’s one of the worst jobs you can do as a DIYer, and it takes forever!
As I already mentioned, it took around 250 hours of sanding and painting in our last house to restore just one flight of stairs.
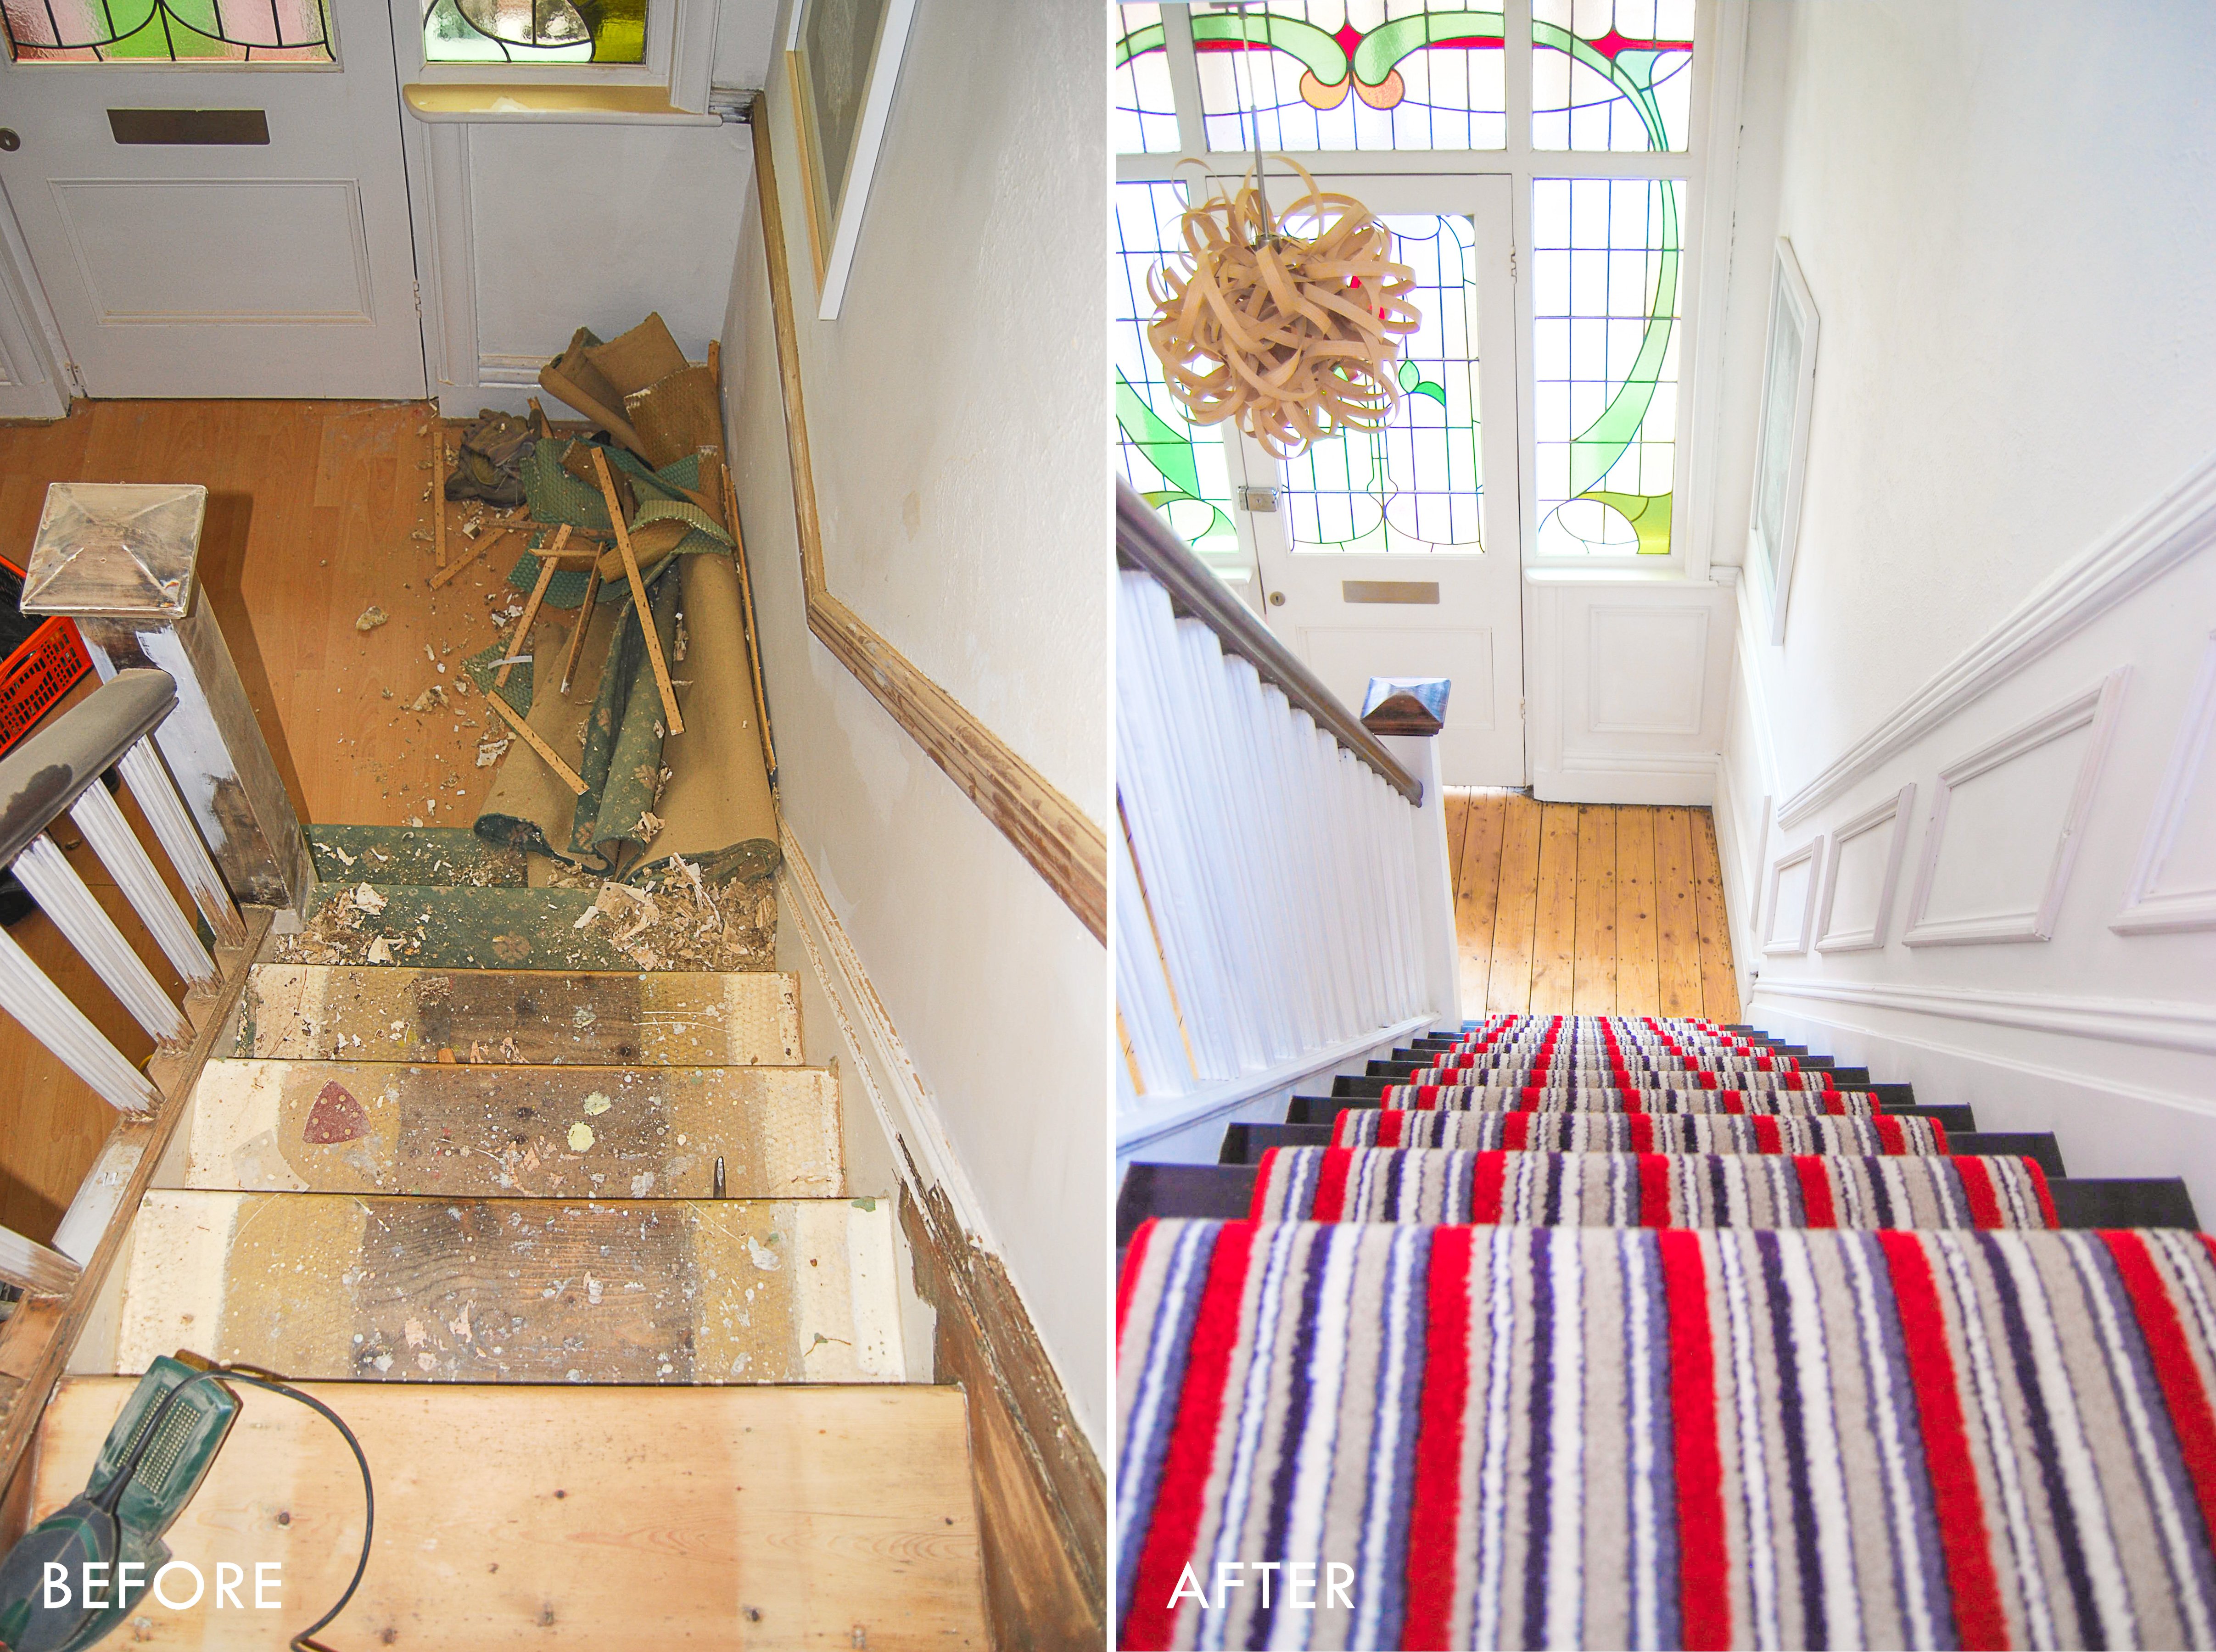
We learned a lot from that experience and are doing things very differently in our current home, especially as we have two flights of stairs, so there’s a lot of work to do.
Using the right sander is essential, and we could have saved days (if not weeks!) of work if we had used better tools.
If your staircase has been painted, I recommend using a combination of different tools. A paint stripper is ideal for removing paint from detailed areas like bannisters, a heat gun is great for old paint, and a paint shaver is perfect for removing large amounts of paint from flat surfaces.
After removing most of the paint, sanding the staircase will be much easier and quicker. This is the best sander for stairs. It’s not too large, and with the interchangeable head, you can easily reach the corners and detailed areas.
For any curved areas, add a soft interface pad that helps mould the sandpaper to the shape of the piece you’re sanding.

I have started sanding our staircase, and this is the method we’re using to save time and get a professional finish. As always, I’ll share a full step-by-step guide once it’s finished.
Paint Scraper
Although I’m talking about sanders, there are a few tools that will make it much easier and quicker to get a good result when stripping paint. Paint scrapers are invaluable, and I can’t recommend them enough!

They come in different sizes and have different-shaped blades to scrape away the existing paint finish.
They are perfect for detailed areas and removing most paint and varnish before sanding. The less paint you have, the quicker it will be to sand, and you’ll save money as you don’t have to replace the sandpaper as frequently.

Dealing with Lead Paint
If you’re working on an older piece of furniture or are sanding anything in an older home, there’s a chance the paint may contain lead. Sanding lead paint releases toxic dust into the air, which is a serious health hazard.
You can get test kits to check if you have lead paint in your house.

Here are a few critical steps to follow if you suspect you’re dealing with lead paint.
Test for Lead
Use a simple at-home lead test kit to check the paint before sanding.
Use a HEPA Filter
If lead is present and you must sand, ensure your sander has a HEPA filter to capture the harmful dust particles.

Wear Protective Gear
Always wear a mask, safety glasses, and gloves when sanding lead paint. Ventilate the area as much as possible by opening windows or using fans to circulate air.
Consider Stripping the Paint
It’s generally safer to use a paint stripper rather than sanding lead paint. This will remove the layers of paint without releasing dust into the air.
You can read our full guide on how to deal with lead paint and safely remove it here.
When to Sand vs. When to Strip
It’s not always clear whether to sand a surface or use a paint stripper, so here’s how we decide.

When to Sand
If the paint is in relatively good condition but needs smoothing, or if you want to remove surface imperfections, sanding is the way to go. Sanding is also great if you’re prepping a surface for a new coat of paint or refinishing wood furniture.
When to Strip
If the paint is peeling or flaking or has multiple layers of old paint, stripping is often a better option. Paint strippers chemically break down the paint, making it easier to remove. Once the bulk of the paint is gone, you can follow up with sanding to smooth the surface.

For larger projects like doors or heavily painted furniture, I usually start with a paint scraper to remove the bulk of the material, then use a sander to refine and smooth the surface. For very detailed areas, we prefer to use this paint stripper.
Don’t forget to test for lead paint, especially if you’re stripping paint in an older house.
Which Sander Should You Buy?
Sanding can be tedious, but with the right tool, it doesn’t have to be.
If you are only investing in one, this sander is our top recommendation based on the projects we’ve tackled over the years.

It’s ideal whether you’re refinishing furniture, smoothing down a wall, or tackling a large woodworking project. It’s also ergonomic and lightweight, so you can work with it longer without getting tired.
There’s no getting around the fact that the sanders I’m recommending are expensive.
We have a lot of power tools, and our sanders are by far the most expensive tools we own, but they’re worth every penny. They’ve had some serious use (we don’t recommend anything we haven’t thoroughly tested) and are the best sanders we’ve ever used.


